Wednesday 29 February 2012

More Civil War Quilts.

At my Tuesday class some of the Civil War quilts are starting to take shape.

 Maureen's is almost finished!
 Celia's is looking good.
 Liz's red, white and blue one is ready for borders.
 Cherry brought in another Kentucky Crossroads quilt top - this one is so bright and springlike! I fell in love with it especially as it included some vintage fabrics.
Cherry has also nearly finished this string star quilt - I love the block layout and the secondary patterns it forms.

Monday 27 February 2012

Civil War Quilt Progress

I have been continuing with my Civil War Quilt.
This quilt was made from Barbara Brackman's Civil War Quilt blog.
It is now complete with sashings.


 I started by adding scrappy sashings which I decided looked too overpowering for an already very scrappy quilt. The only problem is that I had cut all my remaining fabric into 8 and a half  x 2 inch strips. Bad idea!

Then, I decided to use the red fabric that I had intended for borders, this looked much better but means I have no border fabric now!

I added green cornerstones, but then decided I didn't like them either!
Reverse sewing required!

So that is how I finally arrived at the red sashing with no cornerstones.


 I am now contemplating borders, this is a very difficult task as I have very little fabric remaining. The plan is to make a scrappy border first, followed by a border of the remaining red fabric which will have to be pieced as I have no long pieces left.
I could buy more fabric as I have found a supplier on the internet but really I like the challenge of working with what I have.
I originally bought 12 half metre pieces with 1 and a half metres for the borders. The finished quilt will be about 70 inches square so I don't think I have done too bad. I will have enough fabric for binding but not backing. I also have 8 orphan blocks and loads of crumbs!

 Janice, who is making two single bed sized Civil War quilts, has also just finished this lap quilt made with just one of the blocks, Kentucky Crossroads. Lovely isn't it? It is amazing how many of the blocks could be used on their own to make a great quilt.

Finally, these are some of Kath's blocks. She has made them with what she calls 'ugly fabric'!
As you can see the quilt be will far from ugly.

Between now and Easter we will all be trying to get our Civil War Quilts finished. By my reckoning there should be at least 25 between us, we could have our own quilt show!


Sunday 26 February 2012

Little Log Cabin Trees completed.

This was actually completed last Wednesday.
It is always good to report a finish!

Tuesday 21 February 2012

International Quilting Day 2012 - You Are Invited!

Saturday 17th March 2012 is International Quilting Day and I am organising our 2nd Event, hosted by my embroidery / patchwork group here in Barnsley, South Yorkshire, England.

Last year we had over 40 quilters attend and we raised over £650 for our local hospice. It was a fabulous day, enjoyed by everyone who attended so I am really pleased to be able to invite YOU to attend this year.


Here is my little cupcake which we made in one of the workshops last year.

This year I can offer you 3 mini workshops, home baking, a fantastic silent auction, raffle, sales table, show and tell and all this for only £8!

How lovely to spend the day celebrating your love of quilting with like minded people and raise lots of money for charity.

So, will you join us?

Just leave a comment and I will email all the details to you and reserve you a place.

Wednesday 15 February 2012

Borders for Little Log Cabin Trees

   The Little Log Cabin Trees quilt now has two borders and is all layered up ready for quilting.
It was quite difficult to decide which border fabric to use. I had run out of the white on white background fabric and any other white fabric I put next to it just made it look too cream in colour. I knew I wanted a really skinny border made out of my scrap bag strings and then one more border.
After auditioning most of the green fabric in my stash I decided on this green spot on a white background.

 
I really like the skinny border, a bit fiddly to do at 1/2 inch finished width!
I decided to do mitred corners on the outer border.

This little quilt finishes at about 28 inches square and is now layered and tacked. I am quilting it in white cotton thread, outlining the trees first and then I will see how the mood takes me!

Monday 13 February 2012

Trapunto Workshop with Philippa Naylor

On Saturday I was lucky to attend a workshop with Philippa Naylor. Actually I organised it for my embroidery/patchwork group! We have a lovely big venue at the church where we meet so Philippa is able to teach 20 ladies in one class. This is the fourth year that Philippa has taught for our group and this years technique was trapunto. 
Before you ask, last year it was curved piecing, and that is still a UFO so I am hoping to do better this year.
I have decided to share my progress and hopefully this workshop sample will turn into a small quilt.

 The first photo shows my progress of as last night. This is the first stage completed but I will guide you through the process in a series of photos.
 First we drew our design (Philippa's design actually!) onto fabric.
 Then we added a double layer of 80/20 wadding behind the design and stitched just inside the motifs using water soluble thread. This was done using Free Motion Quilting so the line is a bit wobbly - the stitches are supposed to be as long as possible so they are easier to remove, mine vary quite a lot!
 Then you start to cut away the wadding just leaving the areas that you want to have the trapunto effect.
This is a fiddly process but actually quite enjoyable in a theraputic sort of way!
 This then leaves this pattern of wadding shapes on the back that remind me so much of flock wallpaper!

The next stage should be to layer it up with some more 100% cotton wadding and start quilting but I have a little problem! My motifs are quite near the edge so I am going to have at add a border before I do this.

It is half term this week and I have no classes so I hope it is not too long before I can report on the next stage of this small quilt. However I do have my two class samples, my Little Log Cabin Trees and another UFO to work on this week!

Robert returned from New York on Saturday having had a fantastic time - he has taken 800 photos and has bought himself loads of trendy clothes! He would love to go back but not until he is 21!

Monday 6 February 2012

Little Log Cabin Trees become a little quilt top!

Well, I just couldn't resist joining them together!
It was a work of art squeezing enough white fabric out of the bits I had left from a previous project to make sashings and setting triangles but I made it with just inches to spare.
This was my version of a Super Bowl Sew In as I had it on TV last night while I stitched - just up to the Madonna half time show.


I haven't made many quilts 'on point' but it is something we have been discussing in my Tuesday quilt class so I thought it would be good to have a go. There you go I was 'working' after all!

I have now cut some of the very thin strips in the original bag for a very skinny border and then I need some more white on white to finish it off.

Rob is now on his way to Heathrow and my parents are on their way to Scotland so it should be a quiet week around here (hopefully!)

Sunday 5 February 2012

Little Log Cabin Trees

This weekend has been the nearest we have had to a snow weekend this winter.
For various reasons my ongoing class projects did not seem very appealing and I decided to start something new. I have loads of projects that need borders, basting or quilting but really I just wanted to piece. 'Mindless piecing' I call it, just feeding sections through the machine one after another, getting lost in the process and taking your mind off issues going on in your life.
I saw an article on the internet about these little trees and decided to give them a go. Here is the first one I made.

 It all started when I remembered these little bags of scraps I had bought at the Festival of Quilts last year. Just how much fun can you have with a £1.40 bag of fabric?  
 Well, you can make these cute little log cabins!
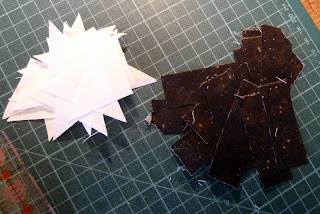
 But first I decided to make a batch of trees. I started with some dark brown scraps which were not in the bag and some white background squares.
 I pieced these to make little trunk sections. Then I sorted my green strips out of the scrap bag.
 The first row of the branches!
 Then the second!
 Finally the third row added, 13 little tree blocks were squared up to just under 4 inches each.
Now all I need to do is add a round of background fabric and join them together....
Or shall I make some more log cabins out of the remains of the bag?
In reality I will be ironing clothes and helping my son, Rob pack for his trip to New York which leaves tomorrow.