Over the last few weeks I have been working on my cheddar bowtie blocks. These were a Bonnie Hunter leader and ender challenge from last year! I decided I didn't like the traditional settings of the block and a visit to google images came up with this alternative setting which I really like. Also , by adding in the plain squares it makes your quilt twice as big! The blocks are 3 inches finished size and the top measures 50 inches square so far.
This is a blog to record my quilting journey. Quilting is my passion. I make quilts, teach patchwork and quilting in South Yorkshire UK and am the co founder of 3 Quilt Groups in Yorkshire.
Showing posts with label Works In Progress. Show all posts
Friday, 30 November 2012
Cheddar Bowties!
Sunday, 29 April 2012
Baskets, Leaves and Trees - more Civil War Blocks on point.
In my Tuesday class we are making more blocks for a small quilt. The purpose of the class for this term is to learn how to make a quilt with blocks 'on point'.
My starting point was the Apple Tree Block from Barbara Brackman's Civil War Quilt blog but then I played around with basket, tree and leaf blocks to come up with 13 blocks which play nicely with each other and are meant to be set 'on point'.
This is the layout I have decided upon.
This is my first layout with the 'heavy' tree blocks on opposite corners but I think that the new layout above looks more balanced. I did think about remaking some of the blocks but that's not in the spirit of patchwork is it?
Here is the starting point - the Apple Tree Block
Next is sashings - although these are not needed in an 'on point' quilt I like them to define my blocks. I did not have enough of my first choice fabric so am now auditioning a couple of fabrics.
The fabric I have used for the blocks is partly Barbara Brackman Civil War Reunion and Woodrow Studios William Morris.
Monday, 27 February 2012
Civil War Quilt Progress
I have been continuing with my Civil War Quilt.
This quilt was made from Barbara Brackman's Civil War Quilt blog.
It is now complete with sashings.
Then, I decided to use the red fabric that I had intended for borders, this looked much better but means I have no border fabric now!
I added green cornerstones, but then decided I didn't like them either!
Reverse sewing required!
So that is how I finally arrived at the red sashing with no cornerstones.
I am now contemplating borders, this is a very difficult task as I have very little fabric remaining. The plan is to make a scrappy border first, followed by a border of the remaining red fabric which will have to be pieced as I have no long pieces left.
I could buy more fabric as I have found a supplier on the internet but really I like the challenge of working with what I have.
I originally bought 12 half metre pieces with 1 and a half metres for the borders. The finished quilt will be about 70 inches square so I don't think I have done too bad. I will have enough fabric for binding but not backing. I also have 8 orphan blocks and loads of crumbs!
Janice, who is making two single bed sized Civil War quilts, has also just finished this lap quilt made with just one of the blocks, Kentucky Crossroads. Lovely isn't it? It is amazing how many of the blocks could be used on their own to make a great quilt.
Finally, these are some of Kath's blocks. She has made them with what she calls 'ugly fabric'!
As you can see the quilt be will far from ugly.
Between now and Easter we will all be trying to get our Civil War Quilts finished. By my reckoning there should be at least 25 between us, we could have our own quilt show!
Wednesday, 15 February 2012
Borders for Little Log Cabin Trees
The Little Log Cabin Trees quilt now has two borders and is all layered up ready for quilting.
It was quite difficult to decide which border fabric to use. I had run out of the white on white background fabric and any other white fabric I put next to it just made it look too cream in colour. I knew I wanted a really skinny border made out of my scrap bag strings and then one more border.
After auditioning most of the green fabric in my stash I decided on this green spot on a white background.
I decided to do mitred corners on the outer border.
This little quilt finishes at about 28 inches square and is now layered and tacked. I am quilting it in white cotton thread, outlining the trees first and then I will see how the mood takes me!
Monday, 13 February 2012
Trapunto Workshop with Philippa Naylor
On Saturday I was lucky to attend a workshop with Philippa Naylor. Actually I organised it for my embroidery/patchwork group! We have a lovely big venue at the church where we meet so Philippa is able to teach 20 ladies in one class. This is the fourth year that Philippa has taught for our group and this years technique was trapunto.
Before you ask, last year it was curved piecing, and that is still a UFO so I am hoping to do better this year.
I have decided to share my progress and hopefully this workshop sample will turn into a small quilt.
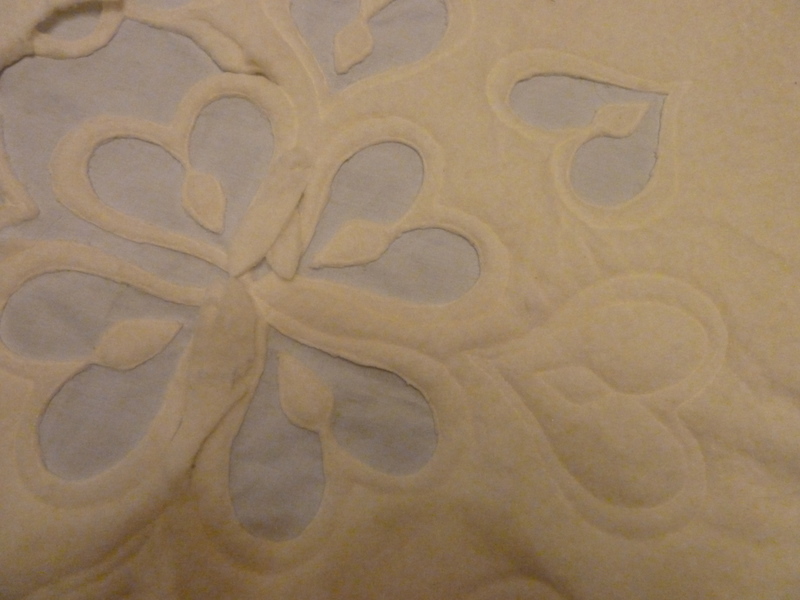
First we drew our design (Philippa's design actually!) onto fabric.
Then we added a double layer of 80/20 wadding behind the design and stitched just inside the motifs using water soluble thread. This was done using Free Motion Quilting so the line is a bit wobbly - the stitches are supposed to be as long as possible so they are easier to remove, mine vary quite a lot!
Then you start to cut away the wadding just leaving the areas that you want to have the trapunto effect.
This is a fiddly process but actually quite enjoyable in a theraputic sort of way!
This then leaves this pattern of wadding shapes on the back that remind me so much of flock wallpaper!
The next stage should be to layer it up with some more 100% cotton wadding and start quilting but I have a little problem! My motifs are quite near the edge so I am going to have at add a border before I do this.
It is half term this week and I have no classes so I hope it is not too long before I can report on the next stage of this small quilt. However I do have my two class samples, my Little Log Cabin Trees and another UFO to work on this week!
Robert returned from New York on Saturday having had a fantastic time - he has taken 800 photos and has bought himself loads of trendy clothes! He would love to go back but not until he is 21!
Monday, 6 February 2012
Little Log Cabin Trees become a little quilt top!
Well, I just couldn't resist joining them together!
It was a work of art squeezing enough white fabric out of the bits I had left from a previous project to make sashings and setting triangles but I made it with just inches to spare.
This was my version of a Super Bowl Sew In as I had it on TV last night while I stitched - just up to the Madonna half time show.
I haven't made many quilts 'on point' but it is something we have been discussing in my Tuesday quilt class so I thought it would be good to have a go. There you go I was 'working' after all!
I have now cut some of the very thin strips in the original bag for a very skinny border and then I need some more white on white to finish it off.
Rob is now on his way to Heathrow and my parents are on their way to Scotland so it should be a quiet week around here (hopefully!)
Sunday, 5 February 2012
Little Log Cabin Trees
This weekend has been the nearest we have had to a snow weekend this winter.
For various reasons my ongoing class projects did not seem very appealing and I decided to start something new. I have loads of projects that need borders, basting or quilting but really I just wanted to piece. 'Mindless piecing' I call it, just feeding sections through the machine one after another, getting lost in the process and taking your mind off issues going on in your life.
I saw an article on the internet about these little trees and decided to give them a go. Here is the first one I made.
Well, you can make these cute little log cabins!
But first I decided to make a batch of trees. I started with some dark brown scraps which were not in the bag and some white background squares.
I pieced these to make little trunk sections. Then I sorted my green strips out of the scrap bag.
The first row of the branches!
Then the second!
Finally the third row added, 13 little tree blocks were squared up to just under 4 inches each.
Now all I need to do is add a round of background fabric and join them together....
Or shall I make some more log cabins out of the remains of the bag?
In reality I will be ironing clothes and helping my son, Rob pack for his trip to New York which leaves tomorrow.
Monday, 23 January 2012
Civil War Quilt
You may be aware that 2011 was the 150th Anniversary of the start of the American Civil War.
In my Tuesday class we have been making a Civil War Quilt. We have been making blocks from Barbara Brackman's Civil War Blog Each week I have taken 2 blocks and written instructions on how to make them. By February 7th we will have made 38 of the 53 on the blog. I have decided to use 36 of the blocks for my quilt. Each block will finish at 8 inches square.
The fabric is Portobello Market by 3 Sisters for Moda
This is the layout I have chosen - although it may change
My design wall is a piece of thick cheap wadding from Dunelm Mill which has been tacked to the wall. Gizmo likes to have a snooze whilst contemplating the layout of the blocks!
.
Here are 4 New England blocks made by some of my students a few weeks ago. I took the photo to illustrate how different a block can look depending on the fabric choices.
I am now at the stage of sashings. On Saturday I cut 84 sashing strips out of the fabric I had left, to make scrappy sashings. On Sunday I decided I didn't like it so I cut out some more strips out of a red fabric I had bought for the borders. I stitched this with green cornerstones. This morning I have decided that I don't like the cornerstones, I think the sashing will look better without them! More reverse sewing today! I always change my mind a few times as I am making a quilt!
Sunday, 29 May 2011
Hello - I'm back again!
Not really sure why I lost my blogging mojo - lots of excuses - all important - but I am still here and I am still quilting!
Since March I have been working hard on my final two City & Guilds pieces, desperately hoping to have them completed before the end of this month but it didn't happen.
My Tuesday patchwork classes have finished now for the summer and we had a fantastic end of year celebration and 'show and tell'.
I have also made a baby quilt for a dear friend's grandson, 15 yards of quilted bunting for another dear friend's daughter's wedding and two lots of birthday bunting for two lovely little girls.
I have been on holiday to Scotland last week and visited the Loch Lomond Quilt Show for the first time.
So as you can see I have been very busy but the good news is I have lots of photos of all these things and hope to share over the next couple of days.
The significance of the photos in this post is that these are two of the inspirational photos I have used for my City & Guilds pieces. I am making a red wholecloth quilt based on designs found on Welsh Celtic crosses and I am also making a 'Golden Wedding' wallhanging for my parents.
Since March I have been working hard on my final two City & Guilds pieces, desperately hoping to have them completed before the end of this month but it didn't happen.
My Tuesday patchwork classes have finished now for the summer and we had a fantastic end of year celebration and 'show and tell'.
I have also made a baby quilt for a dear friend's grandson, 15 yards of quilted bunting for another dear friend's daughter's wedding and two lots of birthday bunting for two lovely little girls.
I have been on holiday to Scotland last week and visited the Loch Lomond Quilt Show for the first time.
So as you can see I have been very busy but the good news is I have lots of photos of all these things and hope to share over the next couple of days.
The significance of the photos in this post is that these are two of the inspirational photos I have used for my City & Guilds pieces. I am making a red wholecloth quilt based on designs found on Welsh Celtic crosses and I am also making a 'Golden Wedding' wallhanging for my parents.The wholecloth is nearly finished - just four cornerstones left to quilt and millions of ends to bury!
I am in that strange pre-holiday limbo at the moment as we leave for a very special holiday on Tuesday (00.30 hours). We are flying to Chicago at 11.00 Tuesday to travel to California and back in a hire car, returning to the UK on July 1st. Our house will be turning into a teenagers hostel and so I am busy packing, washing, ironing, cleaning, shopping etc.
I hope that you will be able to join us on our special 'California Trip' (in the words of the song) through the blog. The first two weeks will be Route 66 in its entirety and then we return via Utah, Colorado, Kansas, Nebraska. It is Geoff's 50th birthday treat so lots of car stuff! Plenty of quilty stuff too!!
Wednesday, 1 December 2010
Teenage Angst - Final Layout
Well winter is well and truly here in Yorkshire and yesterday I had to cancel my patchwork classes due to snow. Today is even worse with probably a foot of snow falling overnight. So today I will continue with my sewing on teenage angst.
The photo shows the final layout of the blocks and I decided to change a couple of them.
I put a black circle in the centre of this one as I felt it needed some black.
I changed the rail fence block as I thought it was too heavy. I like it much better now.
I will try to take some photos of my progress as I have now joined all the blocks together and hope to add the borders today. I have also made a couple of blocks for the back.
The photo shows the final layout of the blocks and I decided to change a couple of them.
Had a good trip to the knitting and stitching show in Harrogate on Sunday but had a nightmare journey home as the snow started falling heavily in the afternoon. It took us 5 hours to get home instead of the usual 1!
Saturday, 27 November 2010
The 12 blocks of Teenage Angst.
If you regularly read my blog I apologise for the lack of content in the last month. No real reason - just didn't feel like sharing I suppose. That doesn't mean I haven't been quilting of course!
Progress is being made on Teenage Angst and I am hoping to have it ready to give as a Christmas gift. The photo shows the initial layout of the 12 blocks before sashings added. Since this photo was taken I have altered two of the blocks and started the sashings. Today I am going to work on a couple of blocks for the back.
I actually love pieced backs - I suppose you could say it is my latest fad - along with mug rugs! (more of that later). My feeling is that if you have to join backing fabric because your quilt is too wide you may as well put in a few blocks to add interest. Also it is a great way of using sample blocks or those that didn't make it onto the front.Progress is being made on Teenage Angst and I am hoping to have it ready to give as a Christmas gift. The photo shows the initial layout of the 12 blocks before sashings added. Since this photo was taken I have altered two of the blocks and started the sashings. Today I am going to work on a couple of blocks for the back.
Snow has arrived in Yorkshire overnight which is a little too early if you ask me! It is very cold but sunny - winter shouldn't have started till Dec 1st but looks like it had other plans. Tomorrow I am going to the Knitting and Stitching show in Harrogate so looking forward to lots of retail therapy!
Sunday, 24 October 2010
Diamond Blocks
Recently I have been working on Jonathan's university quilt which is titled 'Teenage Angst'! It was started in 2003 when I began a couple of the inevitable Lynne Edwards Sampler Quilts. Strictly speaking this is my second quilt after I started quilting in 2002. One of these days I will have to show my first quilt also made for Jonathan titled 'The Road to Baghdad'!
The colour palette is very restricted - black and grey which matched his mood for most of his teenage years.
It will be 12 blocks and the corners will be foundation pieced diamonds - designed by Jonathan himself.
Here is a view of the paper side of one of the 4 blocks.
Foundation piecing is the only way to get those points to meet at the bottom!
Background expanded.
Borders added.
Soon I will show all 12 blocks although a couple of them need small adjustments.
Monday, 11 January 2010
Liberated Stripes Quilt.
The weather is no better here today - still snowing and school closed again. The novelty has worn off now and I want it to go away. Indoor quilting activities are great but this week I have two important quilting events that require travel and at the moment both could be under threat so that is making me stressed.
Over the weekend I have been working on the second quilt made with the over dyed striped fabric. This came about because I had so many leftovers and trial blocks fom the first quilt and also because I wanted to try more liberated quilting. My interpretation of liberated quilting in this particular quilt is using up all the leftovers in as pleasing a pattern as possible.
This is my progress as of last night. It is 33 inches square and has one more border to go on which will be a nine patch border.
I know that some of you in blogland will hate it because it is loud and busy and a bit chaotic but I rather like it and I love being able to use up all the bits so that I can feel a project is truly finished.
Here are photos of the various stages. When using scraps I find the medallion style easier to work with.


I started with 5 metres of striped fabric (it was probably a little extra as they are often generous with the cutting of sale fabric) which was 56 inches wide. Some was over dyed with procion dyes, some dyed in an indigo dye bath and some left undyed. If I have calculated correctly I will have managed to make two quilts with this fabric, both approx 40 inches square including both backs and bindings! So you can see there won't be much fabric left!
Over the weekend I have been working on the second quilt made with the over dyed striped fabric. This came about because I had so many leftovers and trial blocks fom the first quilt and also because I wanted to try more liberated quilting. My interpretation of liberated quilting in this particular quilt is using up all the leftovers in as pleasing a pattern as possible.
I know that some of you in blogland will hate it because it is loud and busy and a bit chaotic but I rather like it and I love being able to use up all the bits so that I can feel a project is truly finished.
One quilt will have a plain undyed back and the other a pieced back which I have made but not had chance to photograph.
Monday, 4 January 2010
Layout for Striped Boxes Quilt.
Yesterday I completed my striped boxes quilt top. This photo is before I sewed it together but you get the idea. Each block is 10 inches square and the quilt is 16 blocks in total. Finished size is around 38 inches square. There will not be a border and it will be bound in a dark blue version of the striped fabric which was dyed in an indigo bath.
Here is a closer look at some of the smaller blocks. The fabric is quite stretchy and frays a lot so perfect boxes were unacheivable but I like them slightly wonky!
Subscribe to:
Posts (Atom)